> ## Documentation Index
> Fetch the complete documentation index at: https://docs.withcortex.ai/llms.txt
> Use this file to discover all available pages before exploring further.
# API Usage
> Learn how to run and interact with workflows using the Cortex API and SDKs.
While you can run workflows directly in the Cortex UI, one of the most powerful aspects of workflows is the ability to integrate them into your applications using the Cortex API or SDKs.
## Using the Result Property
The `result` property plays a central role in API interactions. In your workflow's final code step, any data you return in the `result` property becomes the main output received when calling the workflow via API:
```javascript theme={"system"}
return {
result: {
success: true,
data: modelStep.output.message,
metadata: {
processed_at: new Date().toISOString(),
confidence_score: modelStep.output.message.confidence_score,
},
},
};
```
When you run this workflow via API, the `result` object will be directly accessible in the API response.
### Rules for the Result Property
There are some key rules to remember about how the `result` property works:
1. If the last code step returns a object with a `result` property, it becomes the API response
2. If no `result` property exists, the entire output of the last step becomes the API response
3. Earlier steps results are overridden by the last code step
This means you should ensure your final code step's output contains exactly what you want to return to API consumers.
## Getting Your API Key and Workflow ID
Before you can run workflows via API, you'll need two things:
### 1. Create an API Key
To create an API key:
* Go to the [API Keys page](https://withcortex.ai/c/settings/api-keys)
* Click "New API Key"
* Enter a name for the key
* Copy the key (it will only be shown once)
### 2. Find Your Workflow ID
To copy your workflow ID:
## Running a Workflow via API
Let's take the fields extraction workflow that you built in the [Your First Workflow](/workflows/your-first-workflow) tutorial as an example. Now we'll see how to run it via API to pass dynamic files and extract fields programmatically, making the extracted data available in your application.
### Preparing Your Workflow for API Access
To make your workflow API-ready, you'll need to add a code step that returns the extracted data:
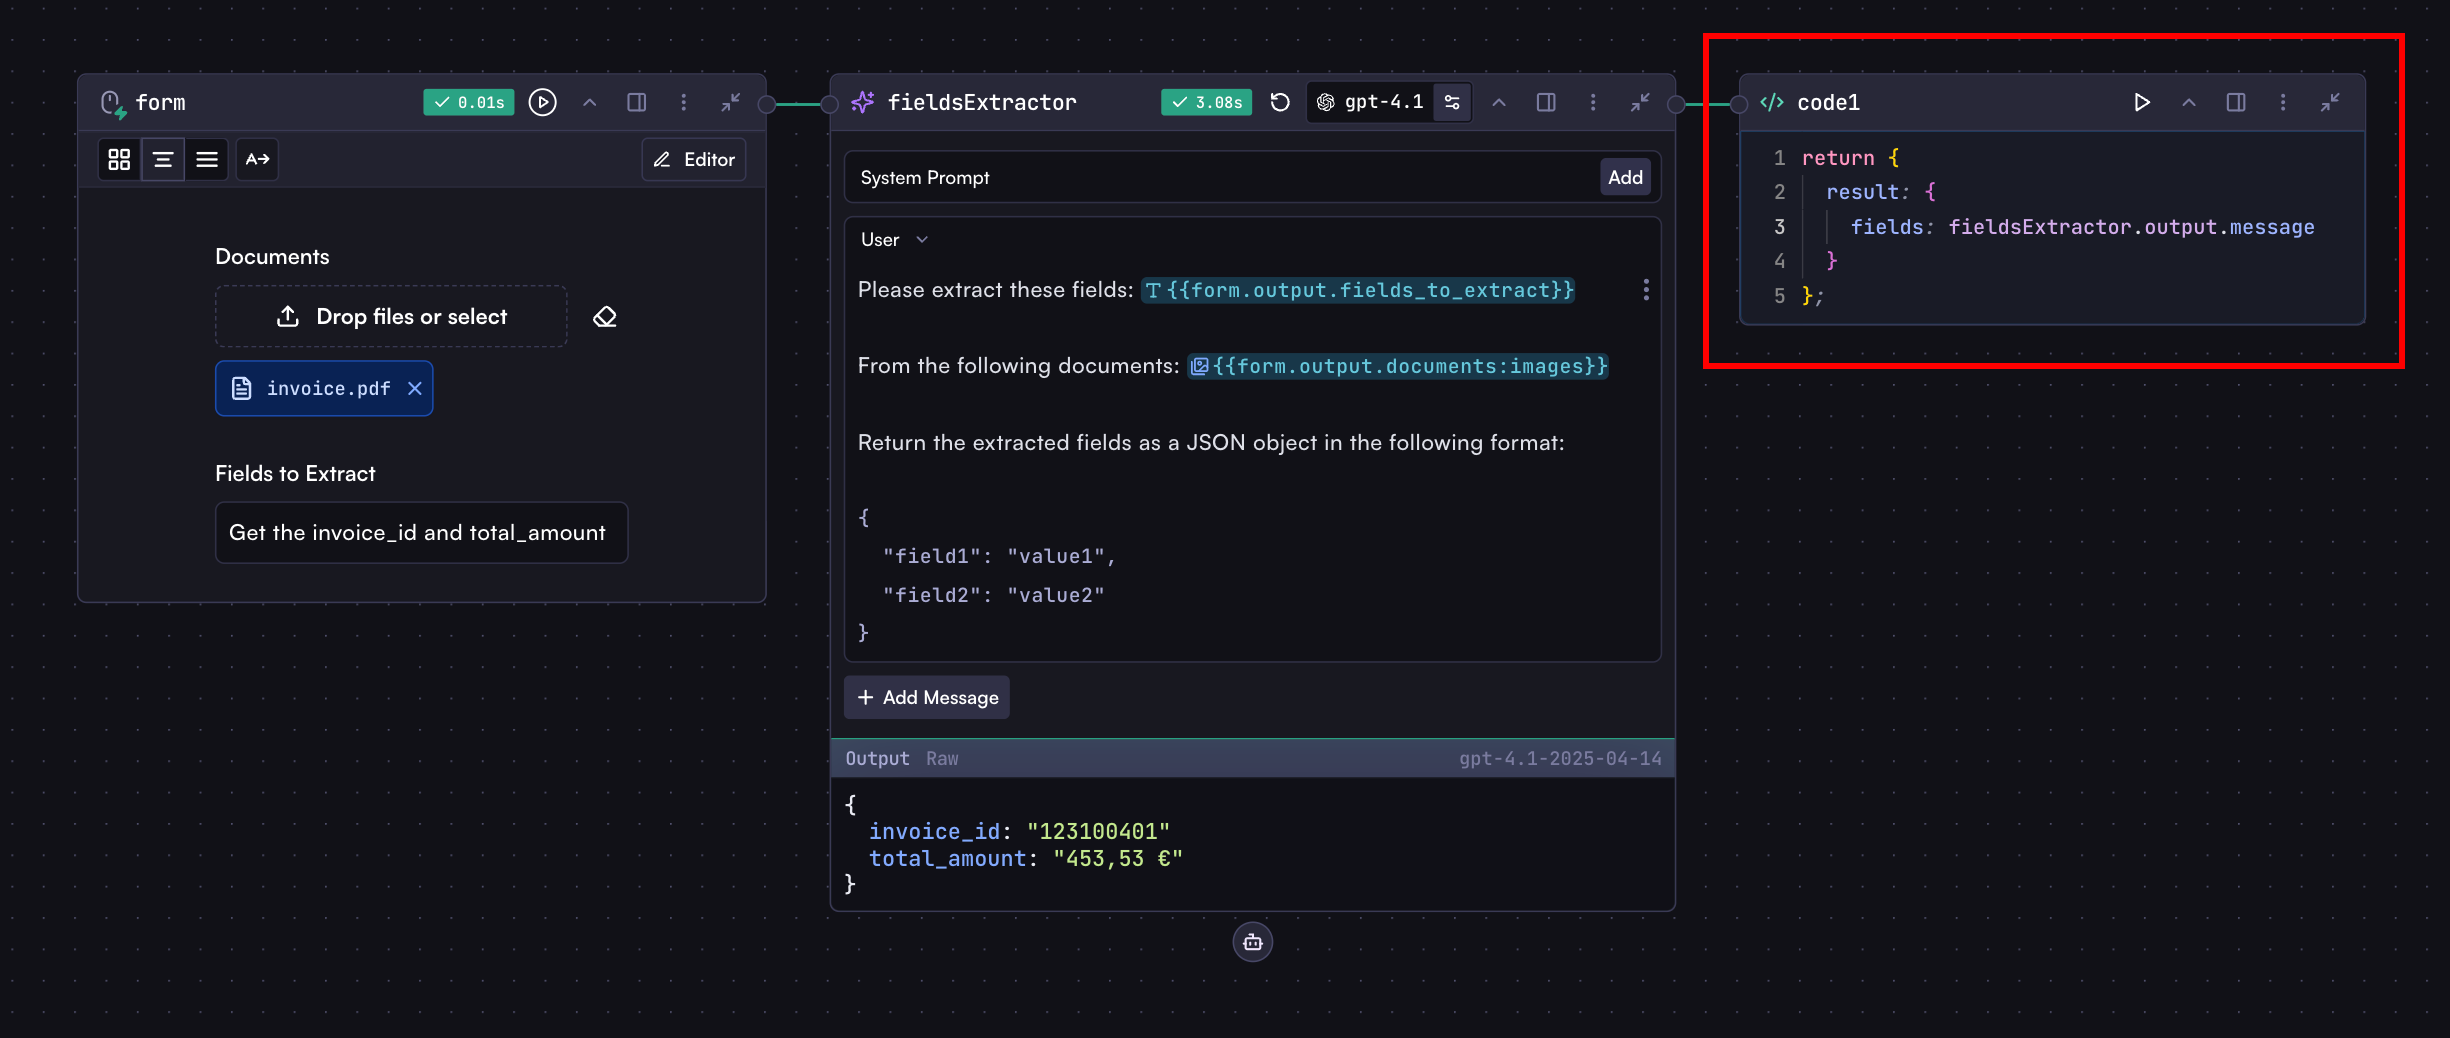 As you can see, the Code step returns an object with a `result` property that has a `fields` property containing the extracted data.
Now, let's deploy the workflow and run it via API. Before you can access your workflow through the API, you need to deploy it first:
1. Follow the instructions in the [Deploy](/workflows/deploy#deploying-a-workflow) section to publish your workflow
2. Once deployed, you can run it via API
### Run It
You can run a workflow using either the REST API with a direct HTTP call or using one of our SDKs.
```javascript Node.js theme={"system"}
import { Cortex } from '@cortex-ai/sdk';
const cortex = new Cortex({
apiKey: process.env.CORTEX_API_KEY,
});
const run = await cortex.apps.workflows.runs.create('YOUR_WORKFLOW_ID', {
input: {
fields_to_extract: 'Get the invoice_number and total_amount',
documents: ['https://example.com/invoice.pdf'],
},
});
console.log(run.result.fields); // {invoice_number: '123456', total_amount: '1000'}
```
```bash cURL theme={"system"}
curl -X POST "https://api.withcortex.ai/apps/c/workflows/YOUR_WORKFLOW_ID/runs" \
-H "Authorization: Bearer YOUR_CORTEX_API_KEY" \
-H "Content-Type: application/json" \
-d '{
"input": {
"documents": ["https://example.com/invoice.pdf"],
"fields_to_extract": "Get the invoice_number and total_amount"
}
}'
```
### Response Structure
The API response contains various information about the run, including:
```json theme={"system"}
{
"id": "run_xxx",
"status": "COMPLETED",
"result": {
"fields": {
"invoice_number": "123456",
"total_amount": "1000"
}
}
// Additional metadata
}
```
The most important field is `result`, which contains the direct output from your workflow's final code step.
## Understanding the Input Object
The `input` object you provide when running a workflow corresponds to the fields you've defined in your workflow's input steps. The structure is based on the field you defined in the input step:
For example, if your input step has fields like:
Your API input would look like:
```json theme={"system"}
{
"input": {
"names": ["Alice", "Mark"],
"preferredContact": "Phone",
"addressInfo": {
"streetAddress": "123 Maple Street, Springfield, IL 62704, USA"
}
}
}
```
## More Options
Beyond the basic `input` object, several additional parameters enable more granular control:
### Workflow Version Control
When running workflows via API, you can specify which version of the workflow to use.
```javascript theme={"system"}
const run = await cortex.apps.workflows.runs.create('YOUR_WORKFLOW_ID', {
input: {
/* input data */
},
workflow_version_id: 'latest', // Options: 'latest', 'draft', or specific version number
});
```
### Starting from a Specific Step
If your workflow has multiple entry points (multiple input steps), you can specify which one to start from:
```javascript theme={"system"}
const run = await cortex.apps.workflows.runs.create('YOUR_WORKFLOW_ID', {
input: {
/* input data of the selected input step */
},
from_step_key: 'myInputStep', // The key of the starting input step
});
```
### Background Processing
For long-running workflows, you can execute them in the background:
```javascript theme={"system"}
const runInfo = await cortex.apps.workflows.runs.create('YOUR_WORKFLOW_ID', {
input: {
/* your input data */
},
background: true, // Returns immediately with run ID that you can poll later
});
// Later, check the status
const completedRun = await cortex.apps.workflows.runs.retrieve(
'YOUR_WORKFLOW_ID',
runInfo.id
);
```
## Error Handling
When running workflows, various errors can occur:
```javascript theme={"system"}
try {
const run = await cortex.apps.workflows.runs.create('YOUR_WORKFLOW_ID', {
input: {
/* your input data */
},
});
if (run.status === 'FAILED') {
console.error('Workflow failed:', run.error);
} else {
console.log('Result:', run.result);
}
} catch (error) {
console.error('API Error:', error.message);
}
```
***
Detailed API documentation including all available parameters and response
fields
As you can see, the Code step returns an object with a `result` property that has a `fields` property containing the extracted data.
Now, let's deploy the workflow and run it via API. Before you can access your workflow through the API, you need to deploy it first:
1. Follow the instructions in the [Deploy](/workflows/deploy#deploying-a-workflow) section to publish your workflow
2. Once deployed, you can run it via API
### Run It
You can run a workflow using either the REST API with a direct HTTP call or using one of our SDKs.
```javascript Node.js theme={"system"}
import { Cortex } from '@cortex-ai/sdk';
const cortex = new Cortex({
apiKey: process.env.CORTEX_API_KEY,
});
const run = await cortex.apps.workflows.runs.create('YOUR_WORKFLOW_ID', {
input: {
fields_to_extract: 'Get the invoice_number and total_amount',
documents: ['https://example.com/invoice.pdf'],
},
});
console.log(run.result.fields); // {invoice_number: '123456', total_amount: '1000'}
```
```bash cURL theme={"system"}
curl -X POST "https://api.withcortex.ai/apps/c/workflows/YOUR_WORKFLOW_ID/runs" \
-H "Authorization: Bearer YOUR_CORTEX_API_KEY" \
-H "Content-Type: application/json" \
-d '{
"input": {
"documents": ["https://example.com/invoice.pdf"],
"fields_to_extract": "Get the invoice_number and total_amount"
}
}'
```
### Response Structure
The API response contains various information about the run, including:
```json theme={"system"}
{
"id": "run_xxx",
"status": "COMPLETED",
"result": {
"fields": {
"invoice_number": "123456",
"total_amount": "1000"
}
}
// Additional metadata
}
```
The most important field is `result`, which contains the direct output from your workflow's final code step.
## Understanding the Input Object
The `input` object you provide when running a workflow corresponds to the fields you've defined in your workflow's input steps. The structure is based on the field you defined in the input step:
For example, if your input step has fields like:
Your API input would look like:
```json theme={"system"}
{
"input": {
"names": ["Alice", "Mark"],
"preferredContact": "Phone",
"addressInfo": {
"streetAddress": "123 Maple Street, Springfield, IL 62704, USA"
}
}
}
```
## More Options
Beyond the basic `input` object, several additional parameters enable more granular control:
### Workflow Version Control
When running workflows via API, you can specify which version of the workflow to use.
```javascript theme={"system"}
const run = await cortex.apps.workflows.runs.create('YOUR_WORKFLOW_ID', {
input: {
/* input data */
},
workflow_version_id: 'latest', // Options: 'latest', 'draft', or specific version number
});
```
### Starting from a Specific Step
If your workflow has multiple entry points (multiple input steps), you can specify which one to start from:
```javascript theme={"system"}
const run = await cortex.apps.workflows.runs.create('YOUR_WORKFLOW_ID', {
input: {
/* input data of the selected input step */
},
from_step_key: 'myInputStep', // The key of the starting input step
});
```
### Background Processing
For long-running workflows, you can execute them in the background:
```javascript theme={"system"}
const runInfo = await cortex.apps.workflows.runs.create('YOUR_WORKFLOW_ID', {
input: {
/* your input data */
},
background: true, // Returns immediately with run ID that you can poll later
});
// Later, check the status
const completedRun = await cortex.apps.workflows.runs.retrieve(
'YOUR_WORKFLOW_ID',
runInfo.id
);
```
## Error Handling
When running workflows, various errors can occur:
```javascript theme={"system"}
try {
const run = await cortex.apps.workflows.runs.create('YOUR_WORKFLOW_ID', {
input: {
/* your input data */
},
});
if (run.status === 'FAILED') {
console.error('Workflow failed:', run.error);
} else {
console.log('Result:', run.result);
}
} catch (error) {
console.error('API Error:', error.message);
}
```
***
Detailed API documentation including all available parameters and response
fields