> ## Documentation Index
> Fetch the complete documentation index at: https://docs.withcortex.ai/llms.txt
> Use this file to discover all available pages before exploring further.
# Agents
> Autonomous AI agents that can reason, plan, and interact with various tools to complete complex tasks.
Before diving into Agents, you should have a basic understanding of Cortex workflows. If you haven't already, we recommend familiarizing yourself with creating your first workflow and understanding workflow steps.
Learn the fundamentals of building workflows in Cortex
Understand the different types of steps and how they work together
Workflow Agents transform your models into autonomous, reasoning systems that interact with tools to perform complex tasks with minimal setup. Connect tools to your model step, provide clear instructions, and watch as the agent orchestrates a sophisticated chain of actions to accomplish your goals.
## What Makes Agents Magical?
Unlike traditional workflow steps that execute in a predefined sequence, agents:
* **Reason dynamically** about which tools to use and when
* **Self-correct** when encountering obstacles
* **Execute chain-of-thought reasoning** to break down complex problems
* **Autonomously fill fields** across connected tools
* **Make decisions** based on real-time information
## Creating Your First Agent: Deep Research Assistant
Let's build something impressive—a comprehensive research assistant that can search the web, browse pages, compare sources, and create a polished report for you. This single agent can accomplish what would typically require complex code or multiple manual steps.
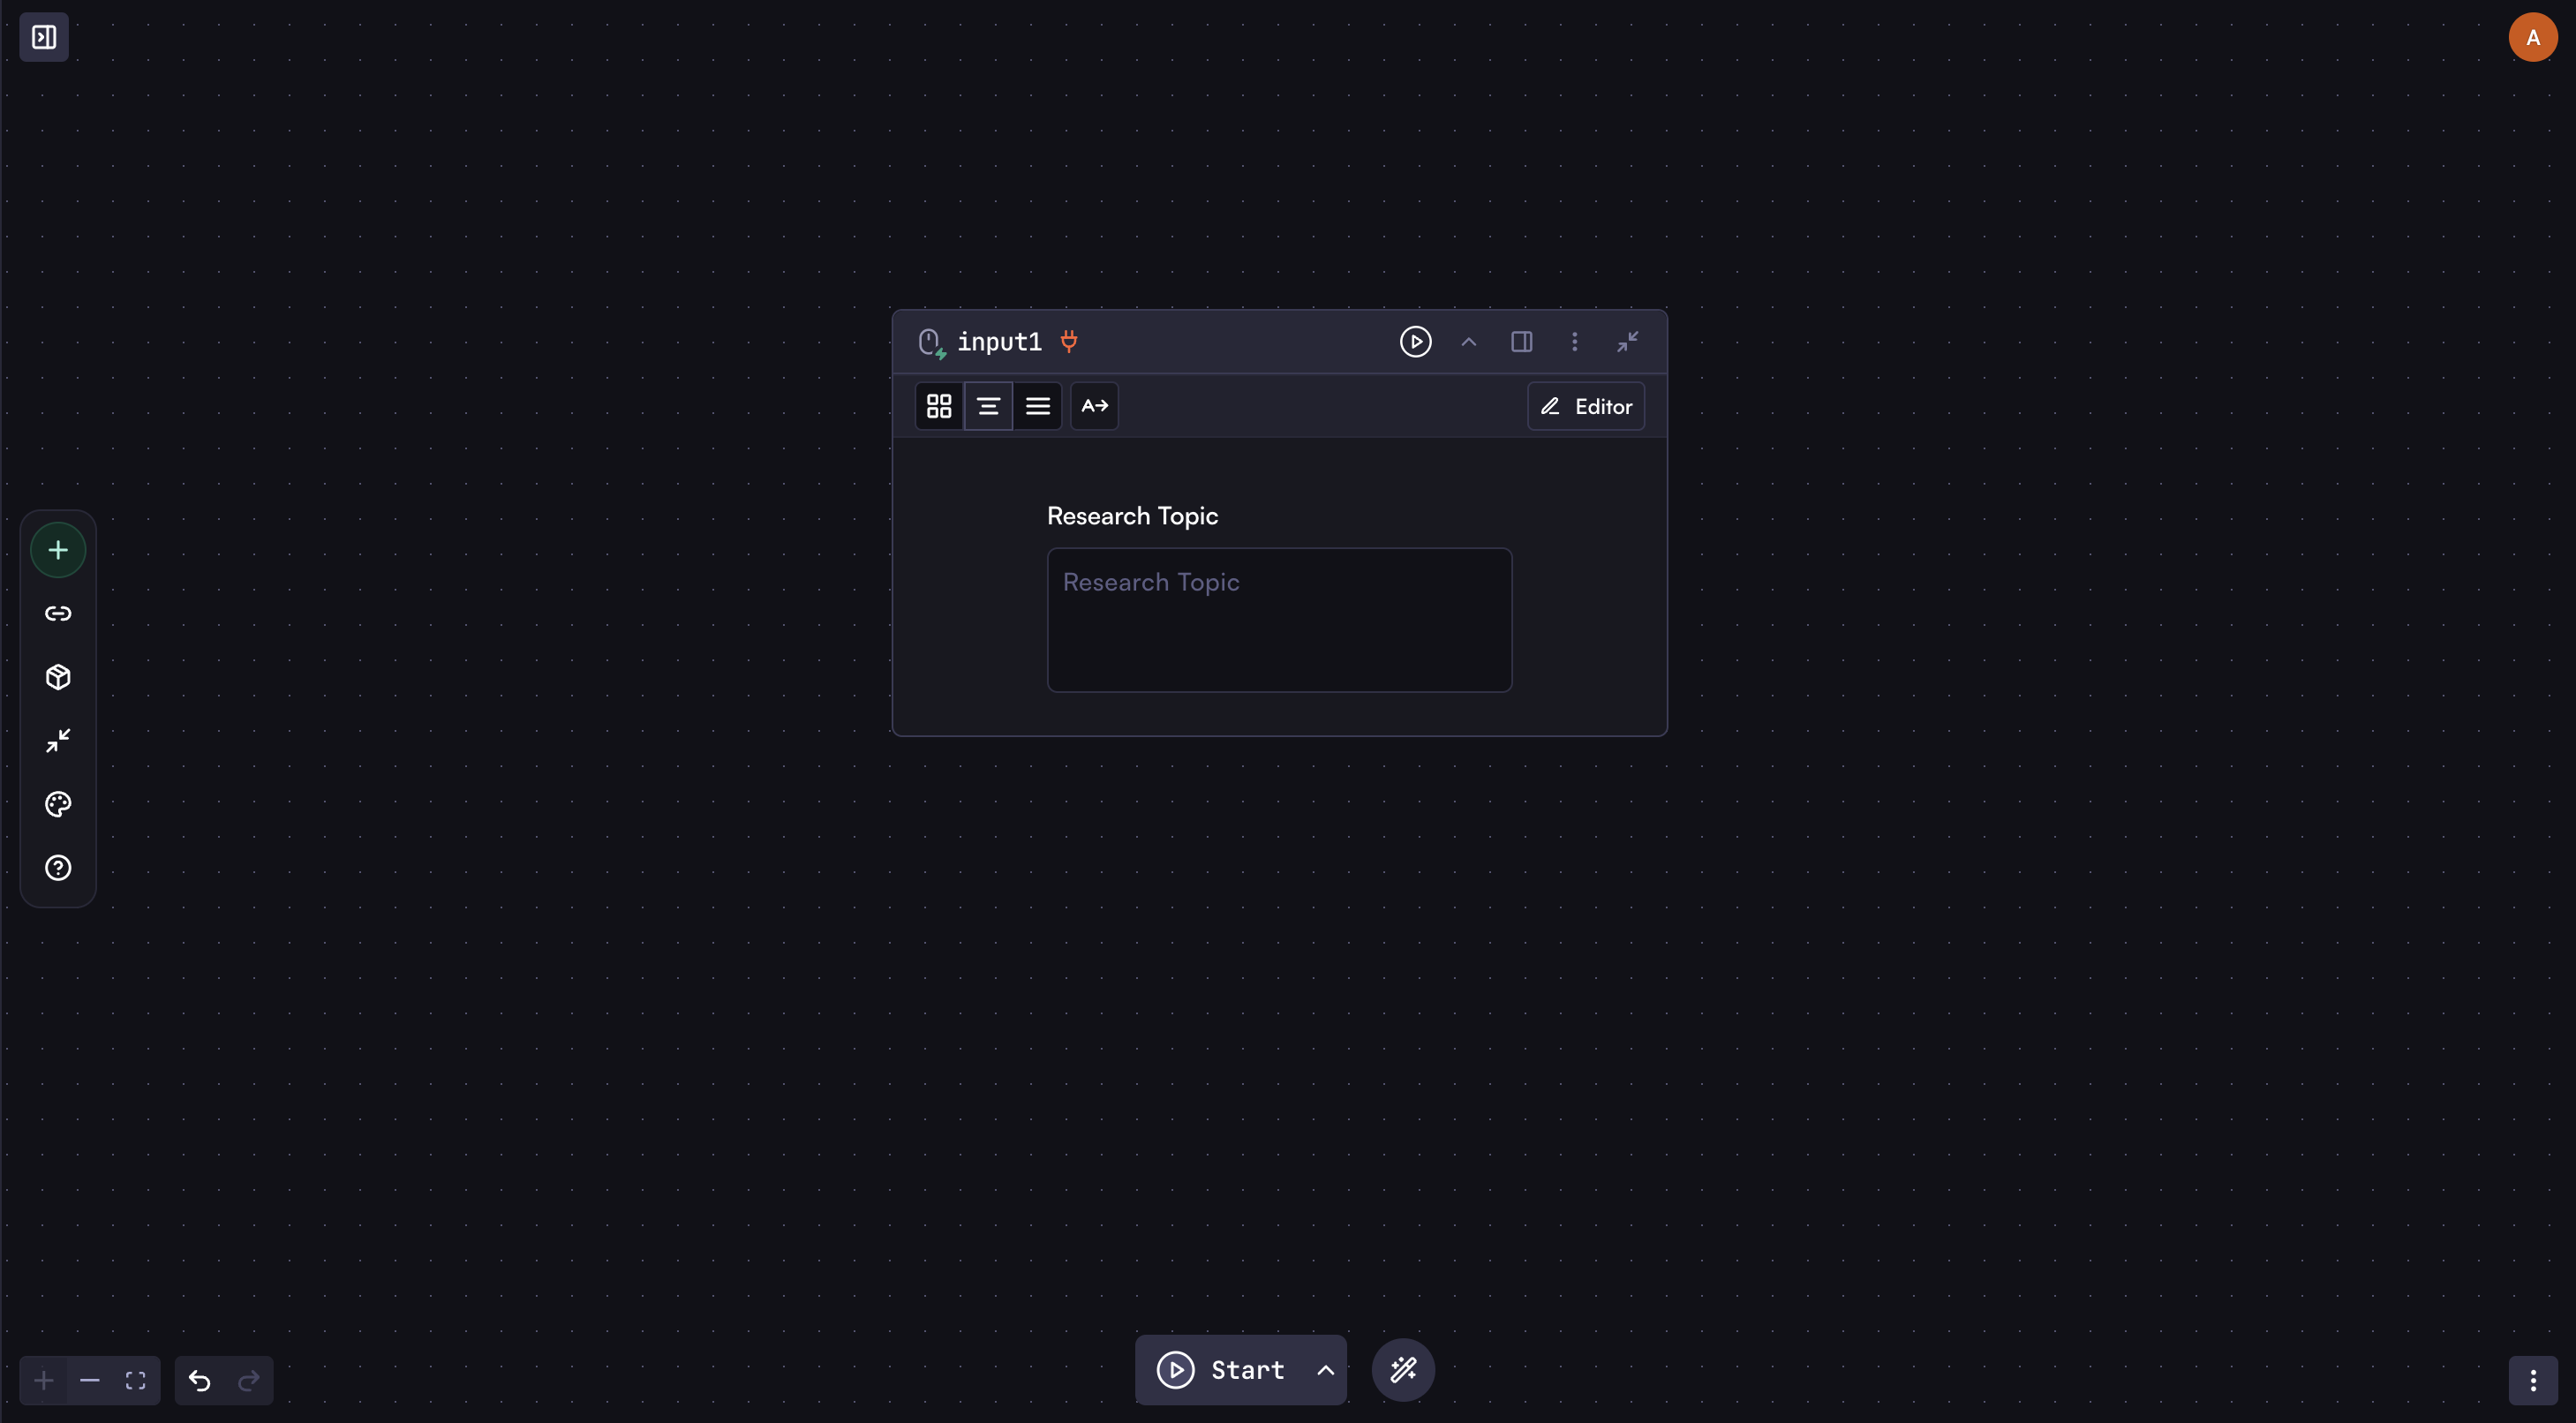
### Create the Input
First, add an **Input** step with a text field for the research topic.
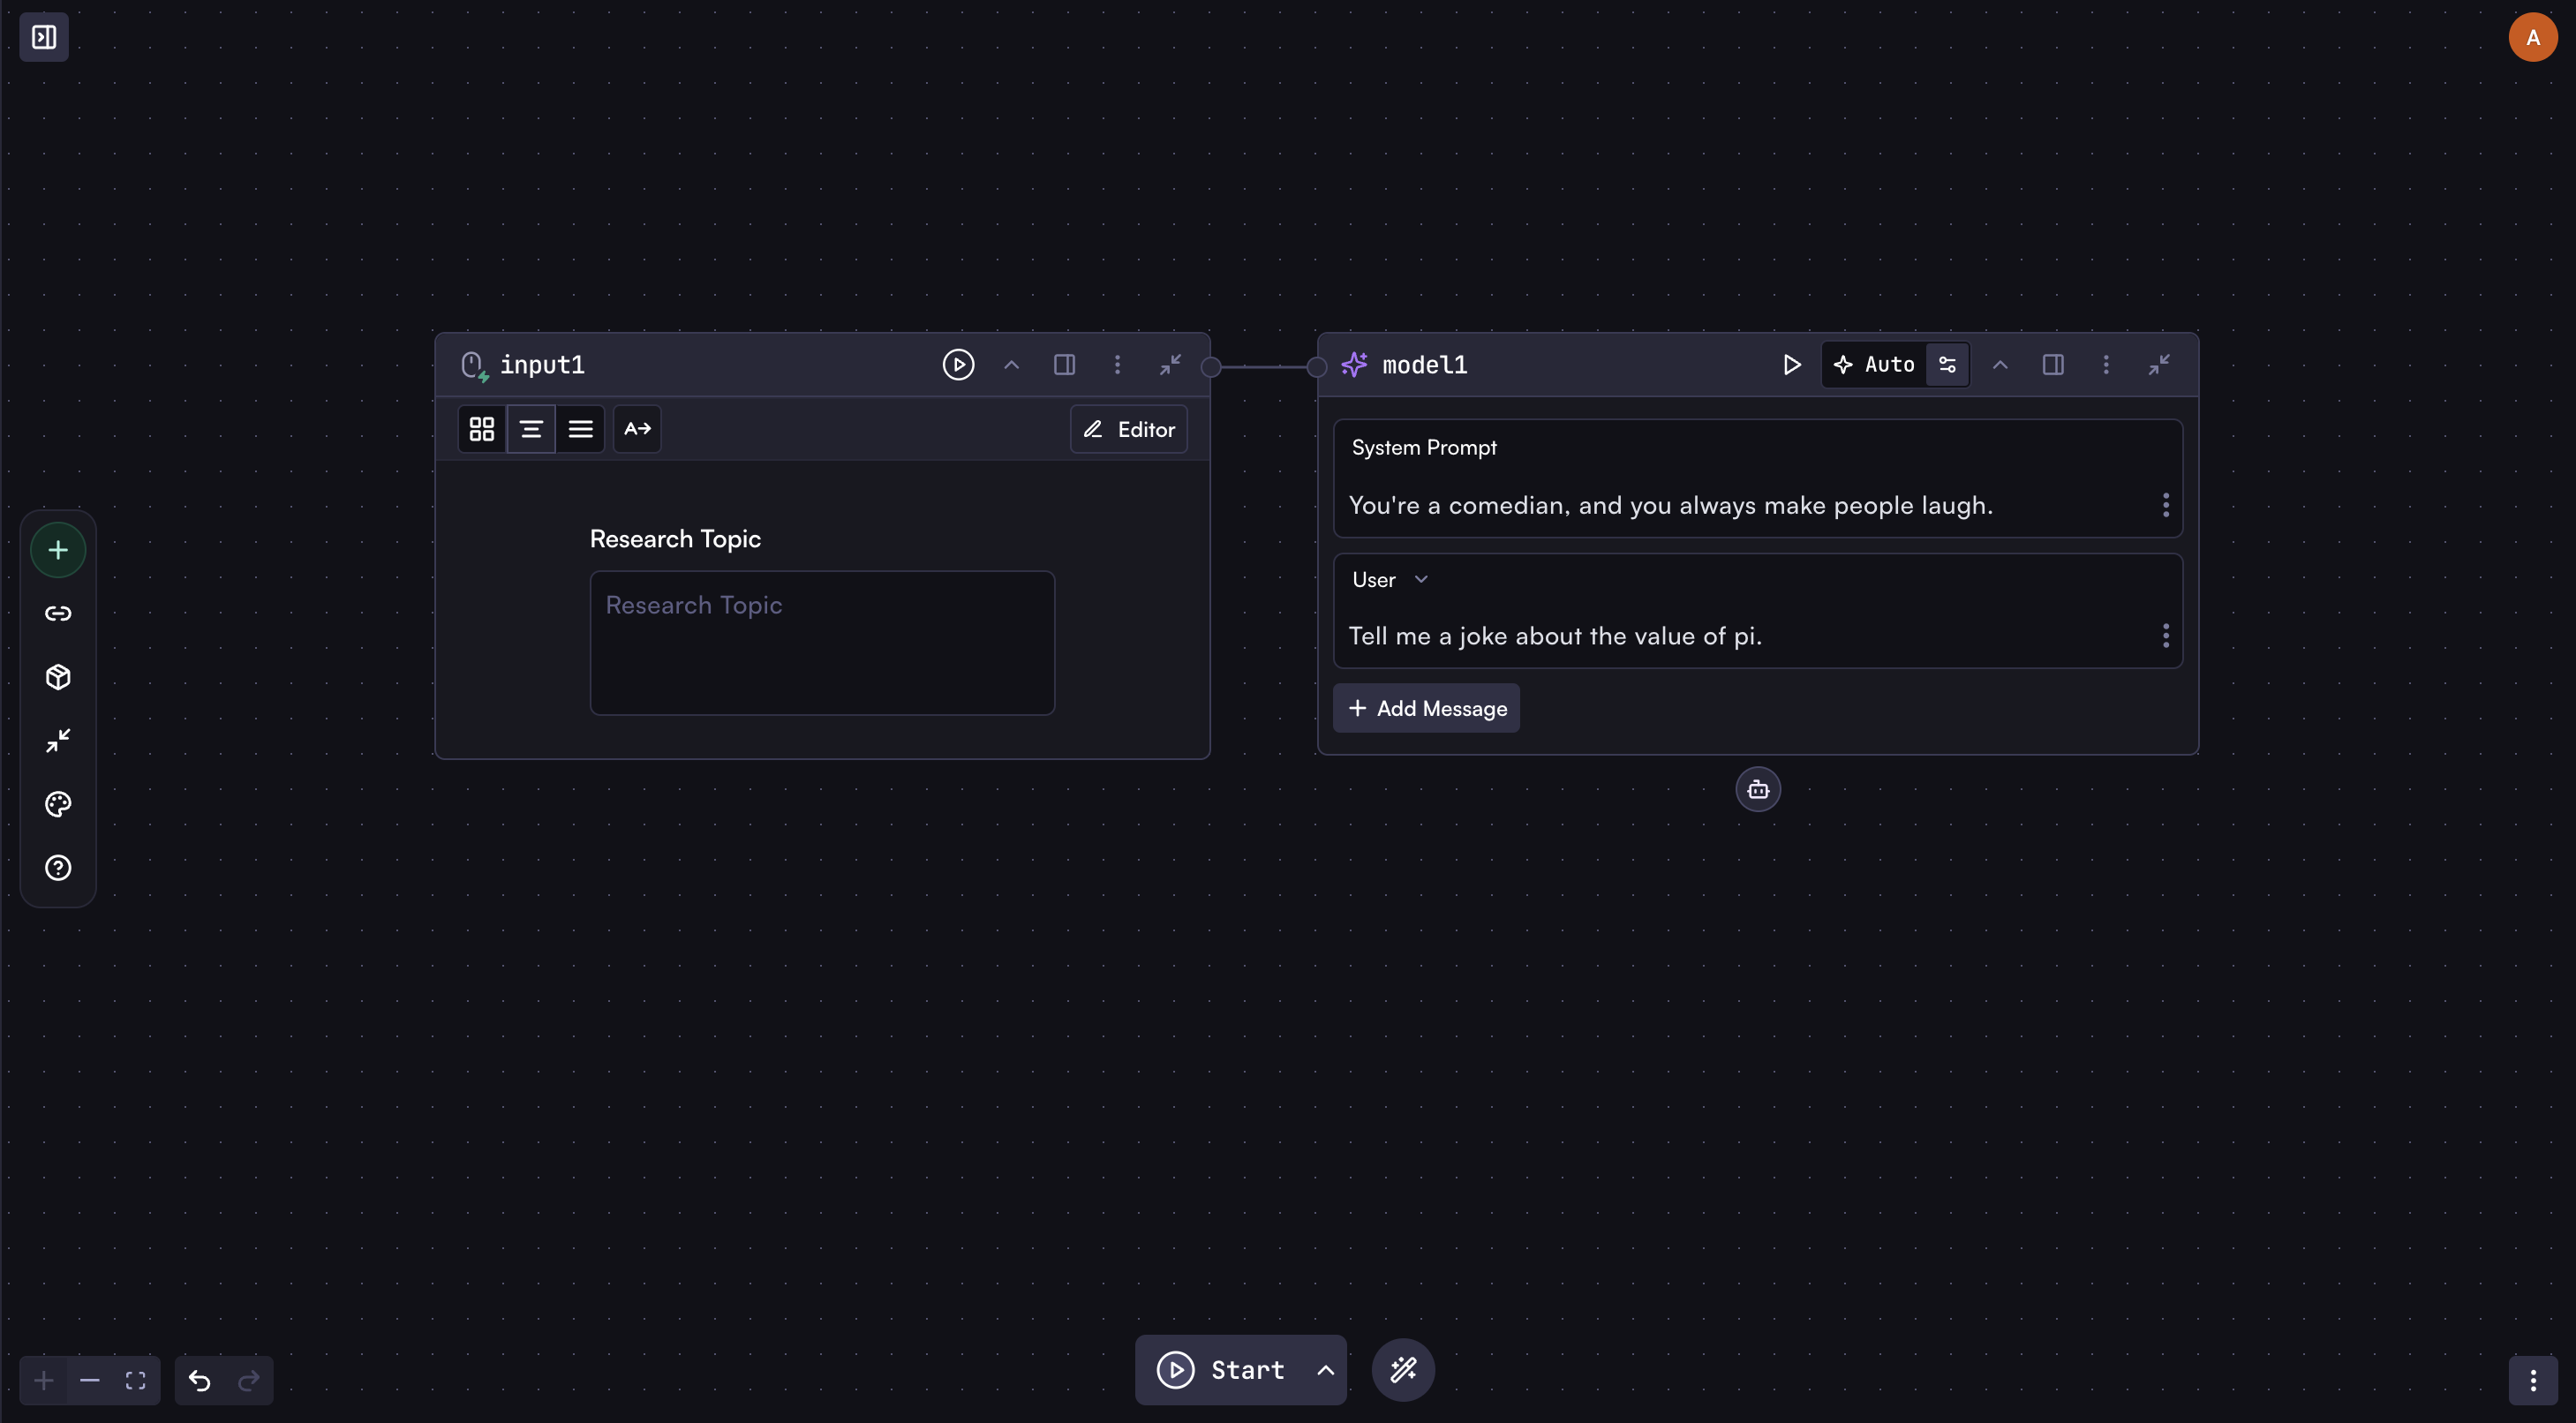
 ### Add Your Model Step
Add a **Model** step connected to the Input step. This will become your agent.
### Add Your Model Step
Add a **Model** step connected to the Input step. This will become your agent.
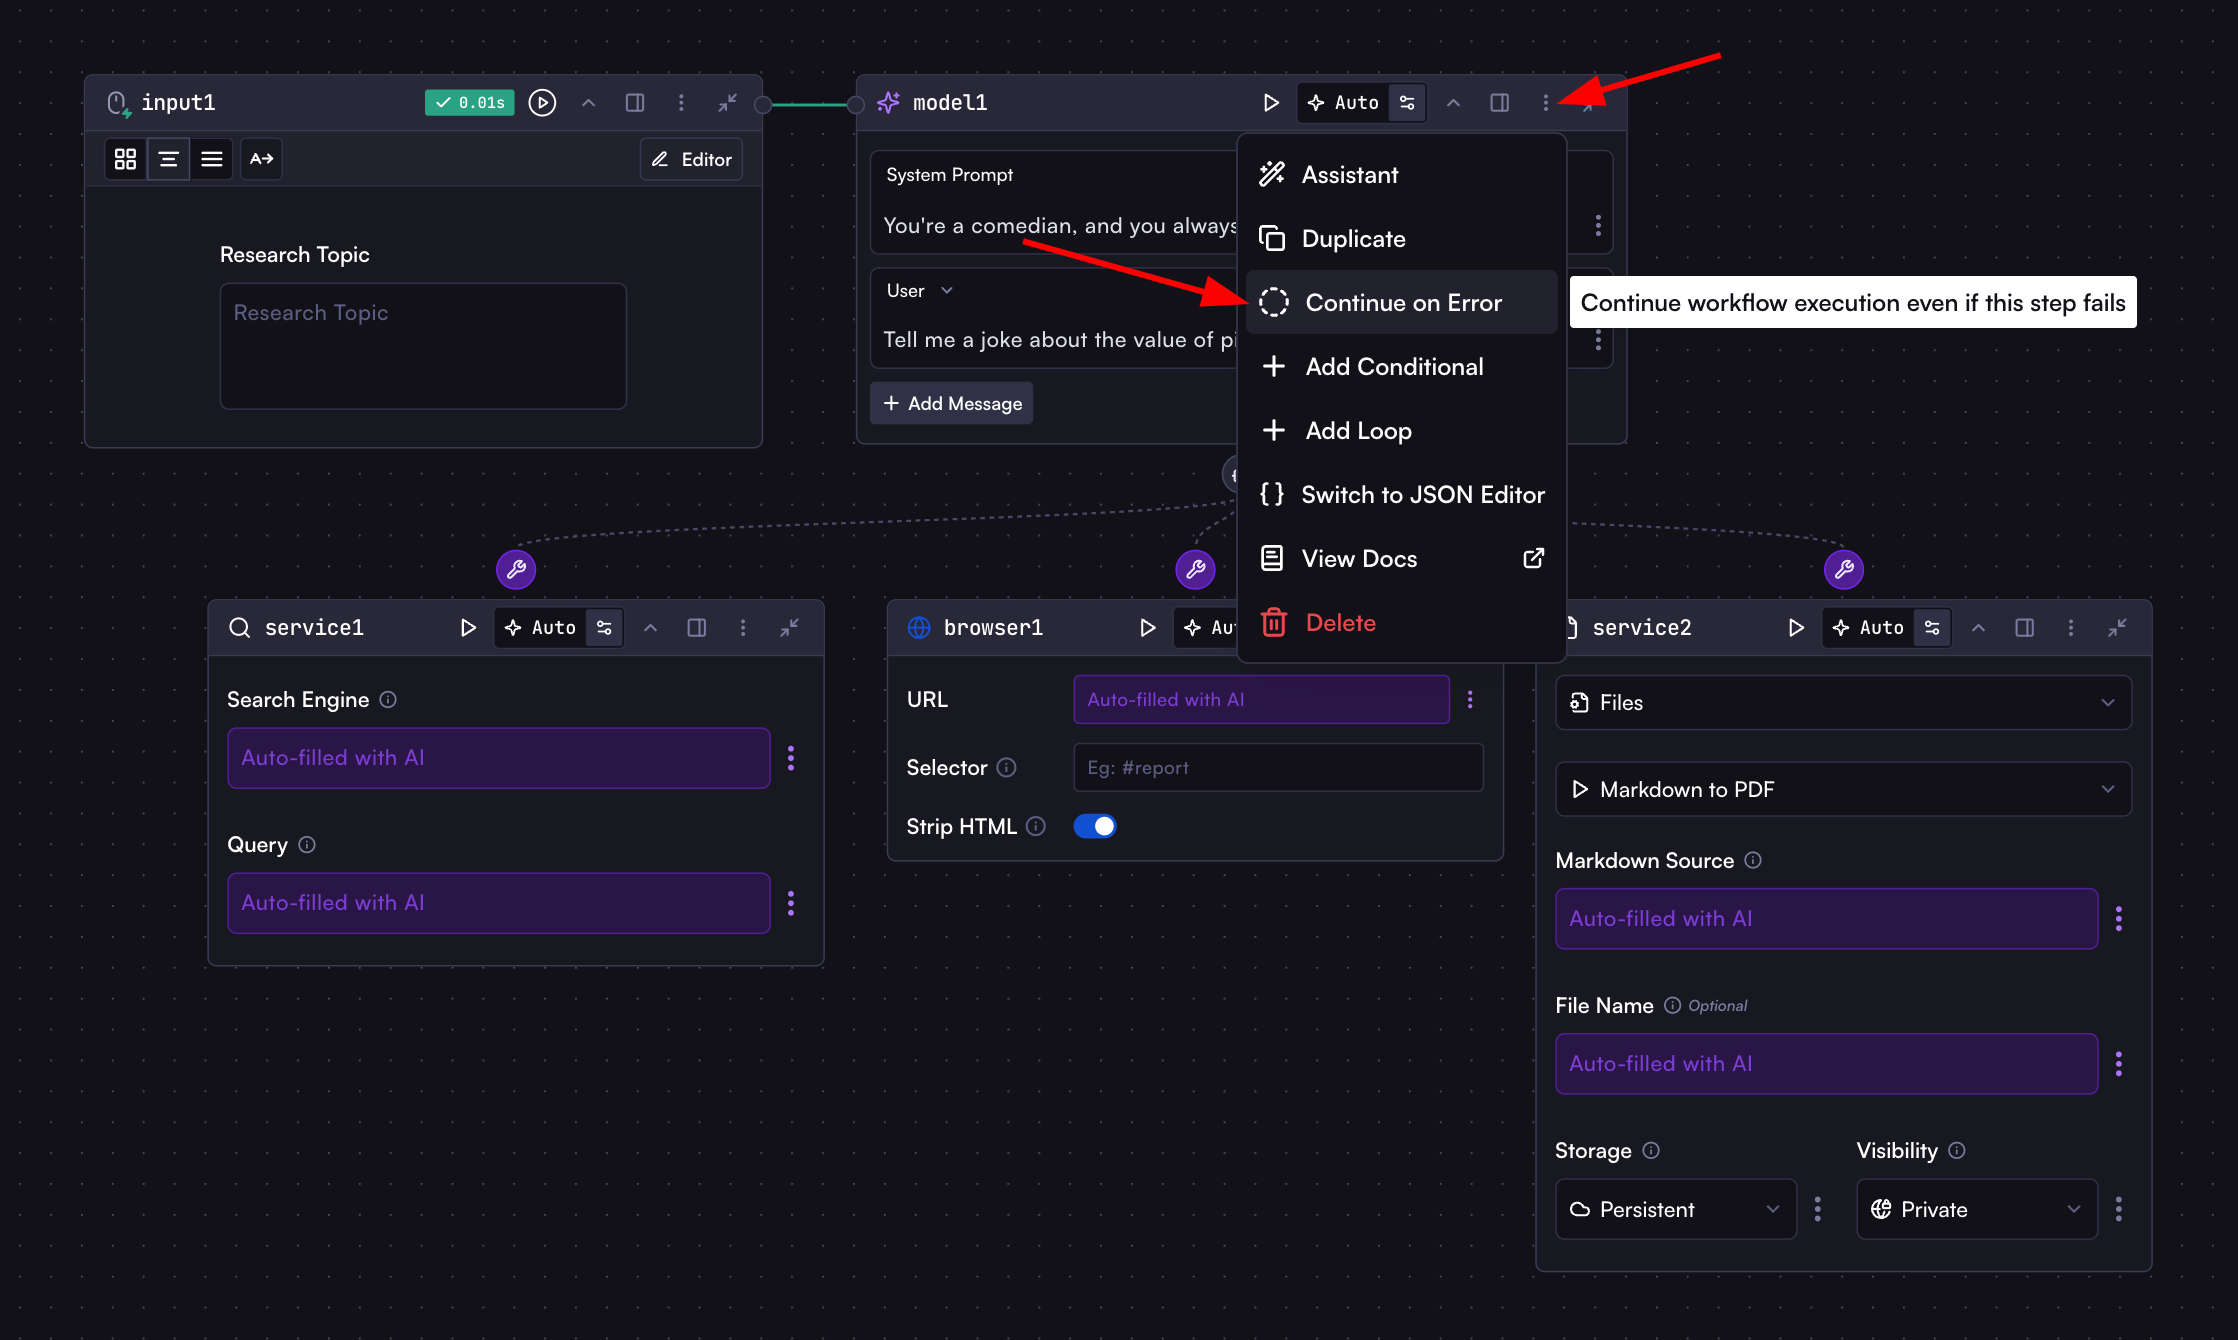
 ### Connect Agent Tools
Here's where the magic begins. Unlike regular workflow steps that connect left-to-right, agent tools connect **vertically below** the model step through the robot icon. This indicates these tools belong to and are controlled by this specific agent.
Connect these three steps as tools to your model:
* **Web Search**
* **Browser**
* **Markdown to PDF**
### Enable AI Auto-Fill for Tool Fields
For each connected tool, set key fields to **Auto**:
1. **Web Search tool**:
* Set "Search Engine" to Auto (lets the agent choose between Google, Bing, etc.)
* Set "Query" to Auto (agent will formulate specific search queries)
2. **Browser step**:
* Set "URL" to Auto (agent will decide which pages to visit based on search results)
3. **Markdown to PDF tool**:
* Set "Markdown Source" to Auto (agent will create the report content)
* Set "Filename" to Auto (agent will name the file appropriately)
When you select "Auto" for a field, the agent will determine the optimal value at runtime based on its reasoning.
### Enable Error Recovery
Open the model step options menu and select "Continue on Error" from the context menu. This allows the agent to recover when tools fail.
### Connect Agent Tools
Here's where the magic begins. Unlike regular workflow steps that connect left-to-right, agent tools connect **vertically below** the model step through the robot icon. This indicates these tools belong to and are controlled by this specific agent.
Connect these three steps as tools to your model:
* **Web Search**
* **Browser**
* **Markdown to PDF**
### Enable AI Auto-Fill for Tool Fields
For each connected tool, set key fields to **Auto**:
1. **Web Search tool**:
* Set "Search Engine" to Auto (lets the agent choose between Google, Bing, etc.)
* Set "Query" to Auto (agent will formulate specific search queries)
2. **Browser step**:
* Set "URL" to Auto (agent will decide which pages to visit based on search results)
3. **Markdown to PDF tool**:
* Set "Markdown Source" to Auto (agent will create the report content)
* Set "Filename" to Auto (agent will name the file appropriately)
When you select "Auto" for a field, the agent will determine the optimal value at runtime based on its reasoning.
### Enable Error Recovery
Open the model step options menu and select "Continue on Error" from the context menu. This allows the agent to recover when tools fail.
 For example, if the browser tool fails to access a page due to restrictions, the agent can:
1. Recognize the failure
2. Try alternative sources
3. Continue its research using other available information
4. Still complete its task successfully
### Add Your Prompt
In the model step, add this simple prompt:
For example, if the browser tool fails to access a page due to restrictions, the agent can:
1. Recognize the failure
2. Try alternative sources
3. Continue its research using other available information
4. Still complete its task successfully
### Add Your Prompt
In the model step, add this simple prompt:
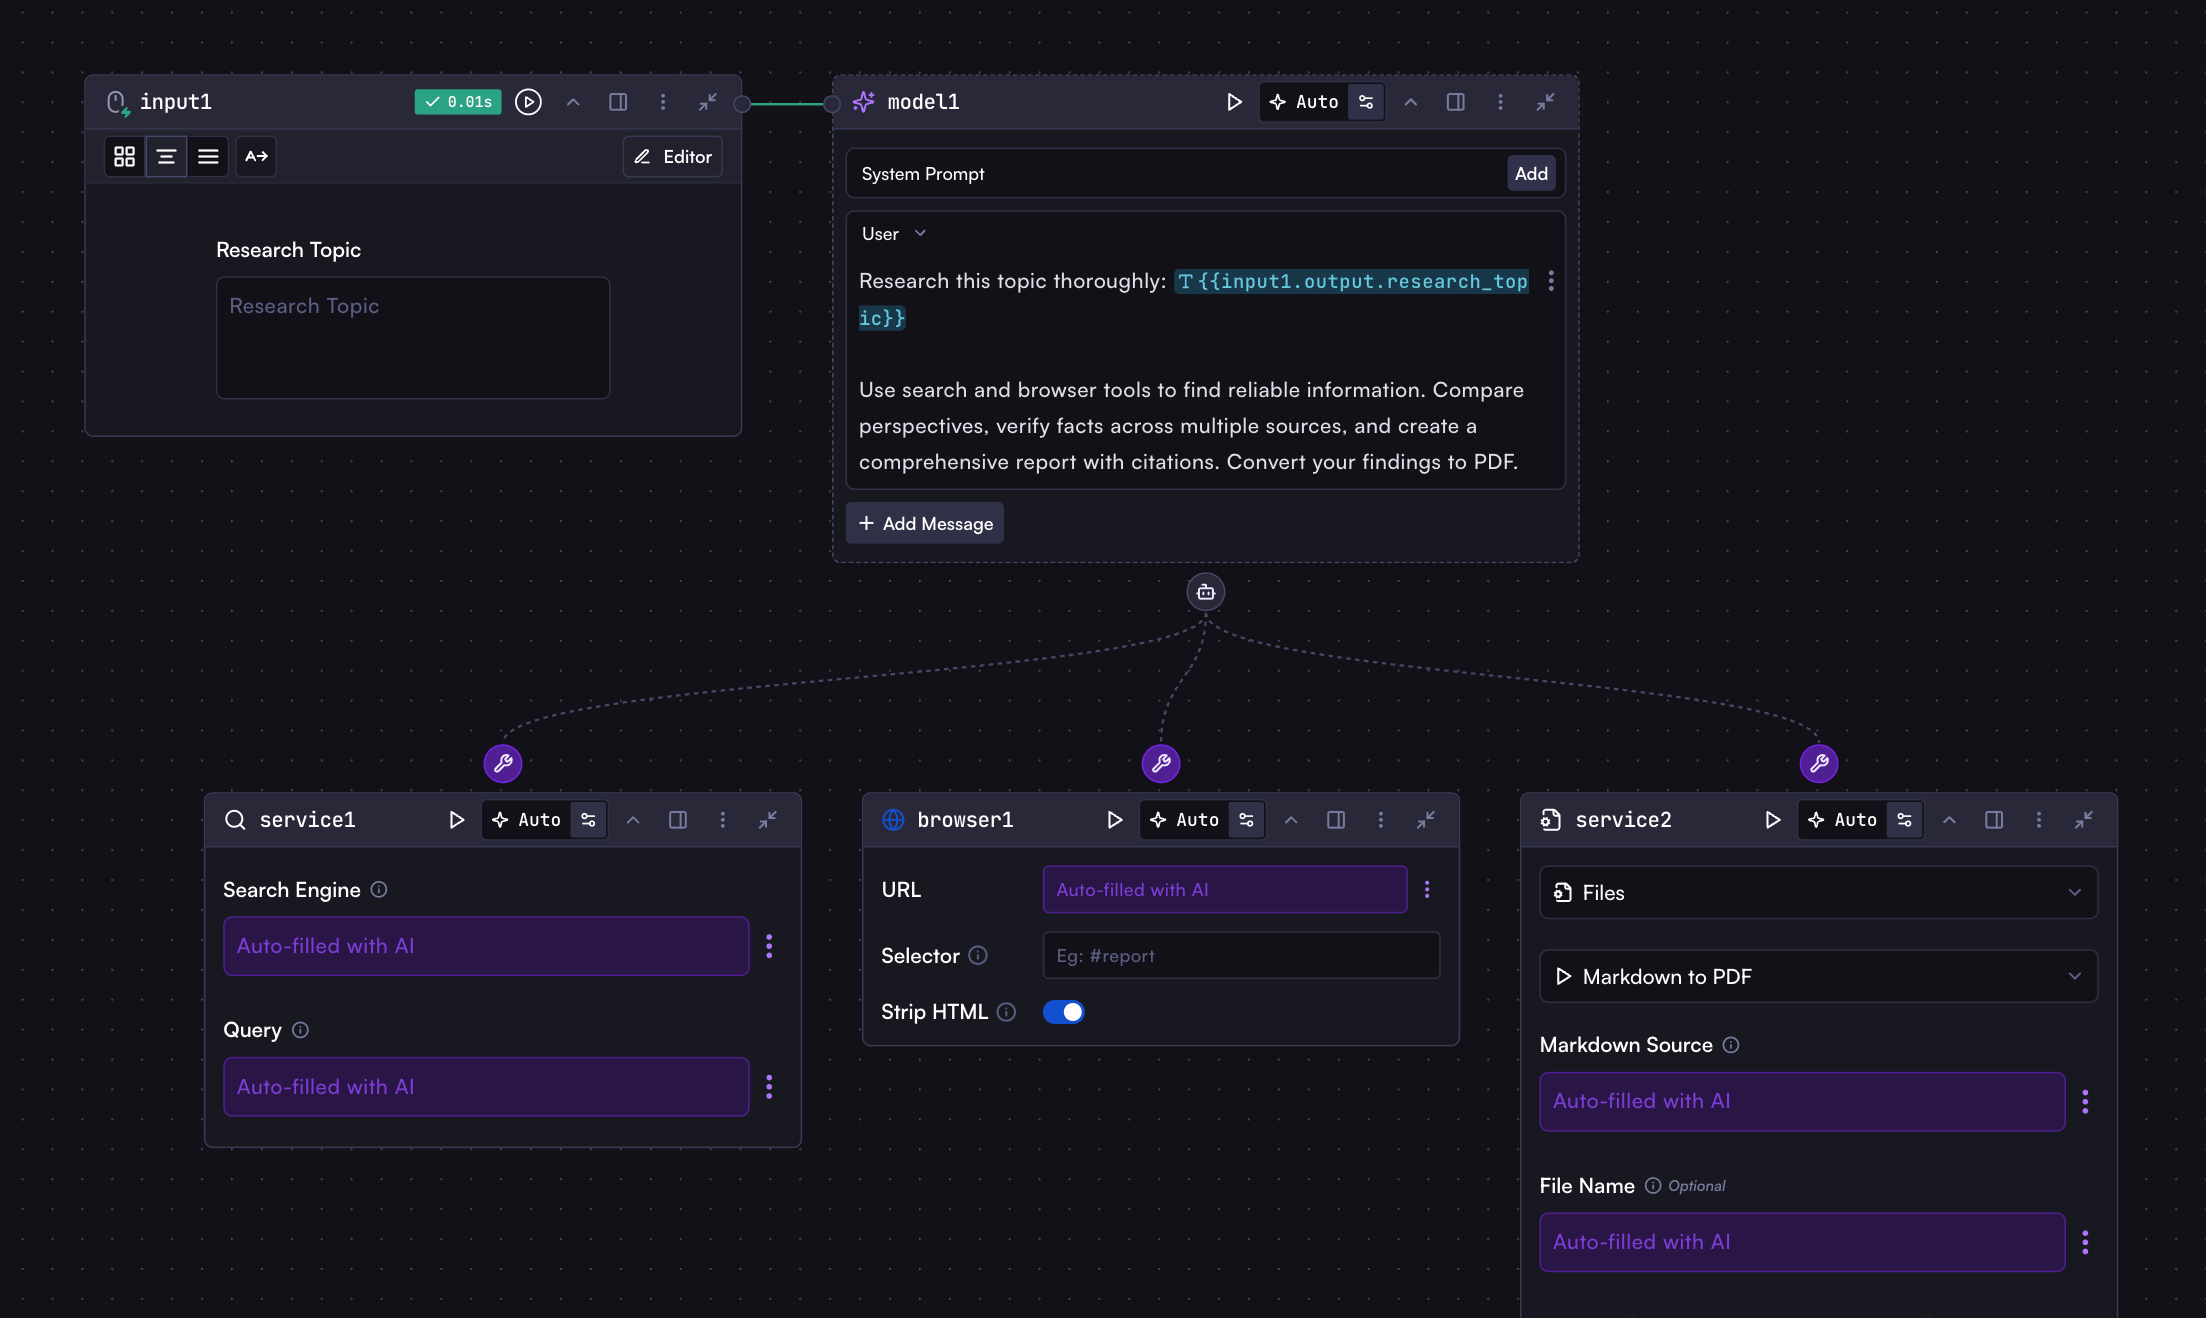 ```
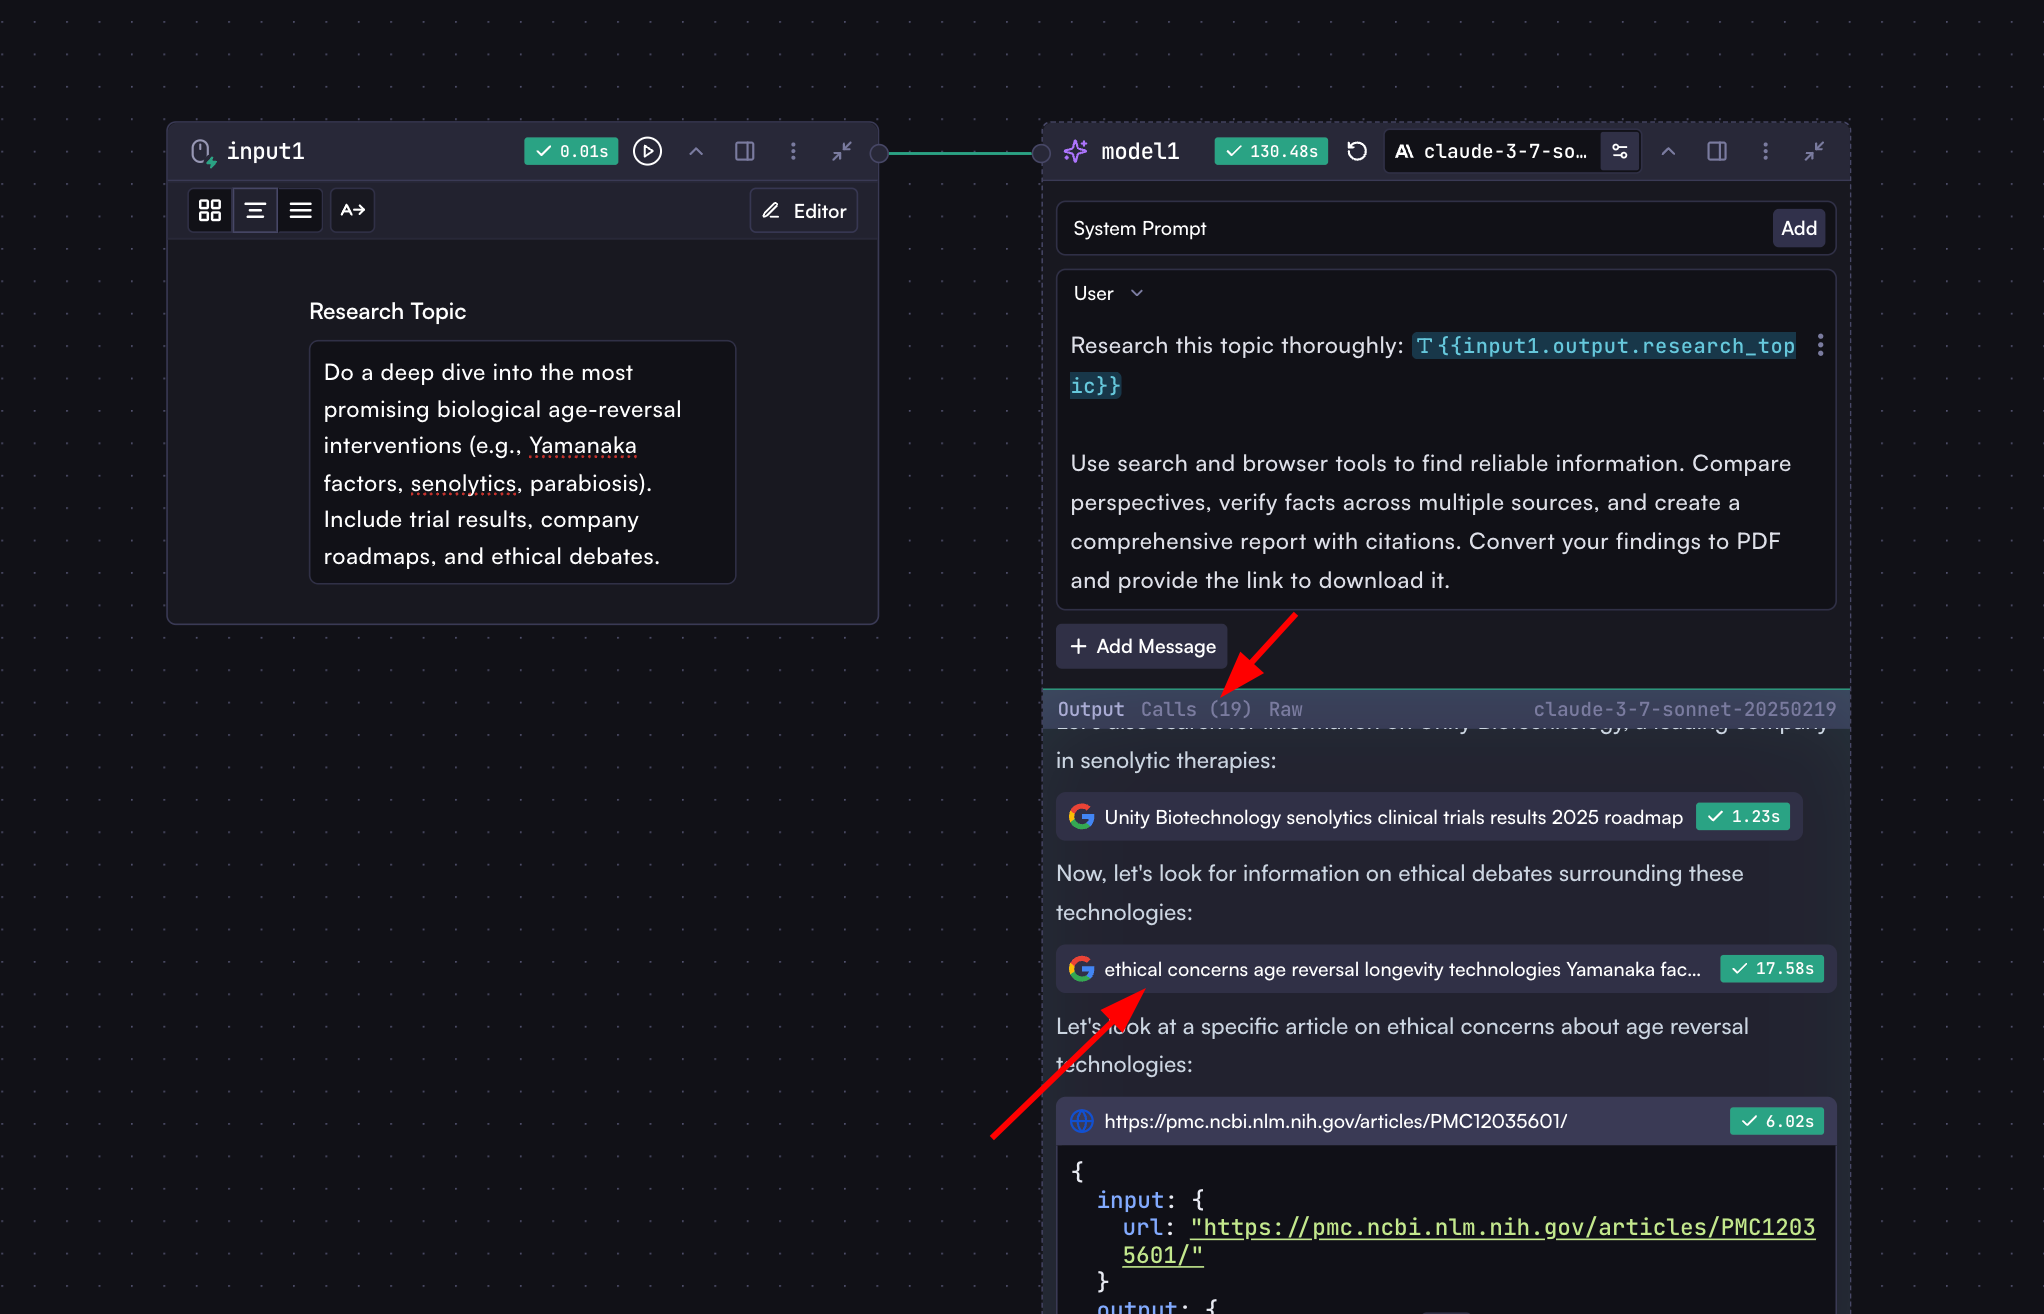
Research this topic thoroughly: {{input1.output.research_topic}}
Use search and browser tools to find reliable information. Compare perspectives, verify facts across multiple sources, and create a comprehensive report with citations. Convert your findings to PDF and provide the link to download it.
```
That's it! With just these few lines, the agent knows exactly what to do.
### Run Your First Agent!
Run the workflow with any research topic and watch the magic unfold! Your agent autonomously breaks down the topic, formulates search queries, browses websites, compares perspectives, verifies facts, and delivers a comprehensive, well-organized PDF report—all without any further input from you.
## Monitoring Agent Actions
When your agent runs, you can observe its reasoning and tool usage:
1. The **Output** section shows the agent's thinking process
2. The **Calls** tab displays each tool invocation with input parameters and results
```
Research this topic thoroughly: {{input1.output.research_topic}}
Use search and browser tools to find reliable information. Compare perspectives, verify facts across multiple sources, and create a comprehensive report with citations. Convert your findings to PDF and provide the link to download it.
```
That's it! With just these few lines, the agent knows exactly what to do.
### Run Your First Agent!
Run the workflow with any research topic and watch the magic unfold! Your agent autonomously breaks down the topic, formulates search queries, browses websites, compares perspectives, verifies facts, and delivers a comprehensive, well-organized PDF report—all without any further input from you.
## Monitoring Agent Actions
When your agent runs, you can observe its reasoning and tool usage:
1. The **Output** section shows the agent's thinking process
2. The **Calls** tab displays each tool invocation with input parameters and results
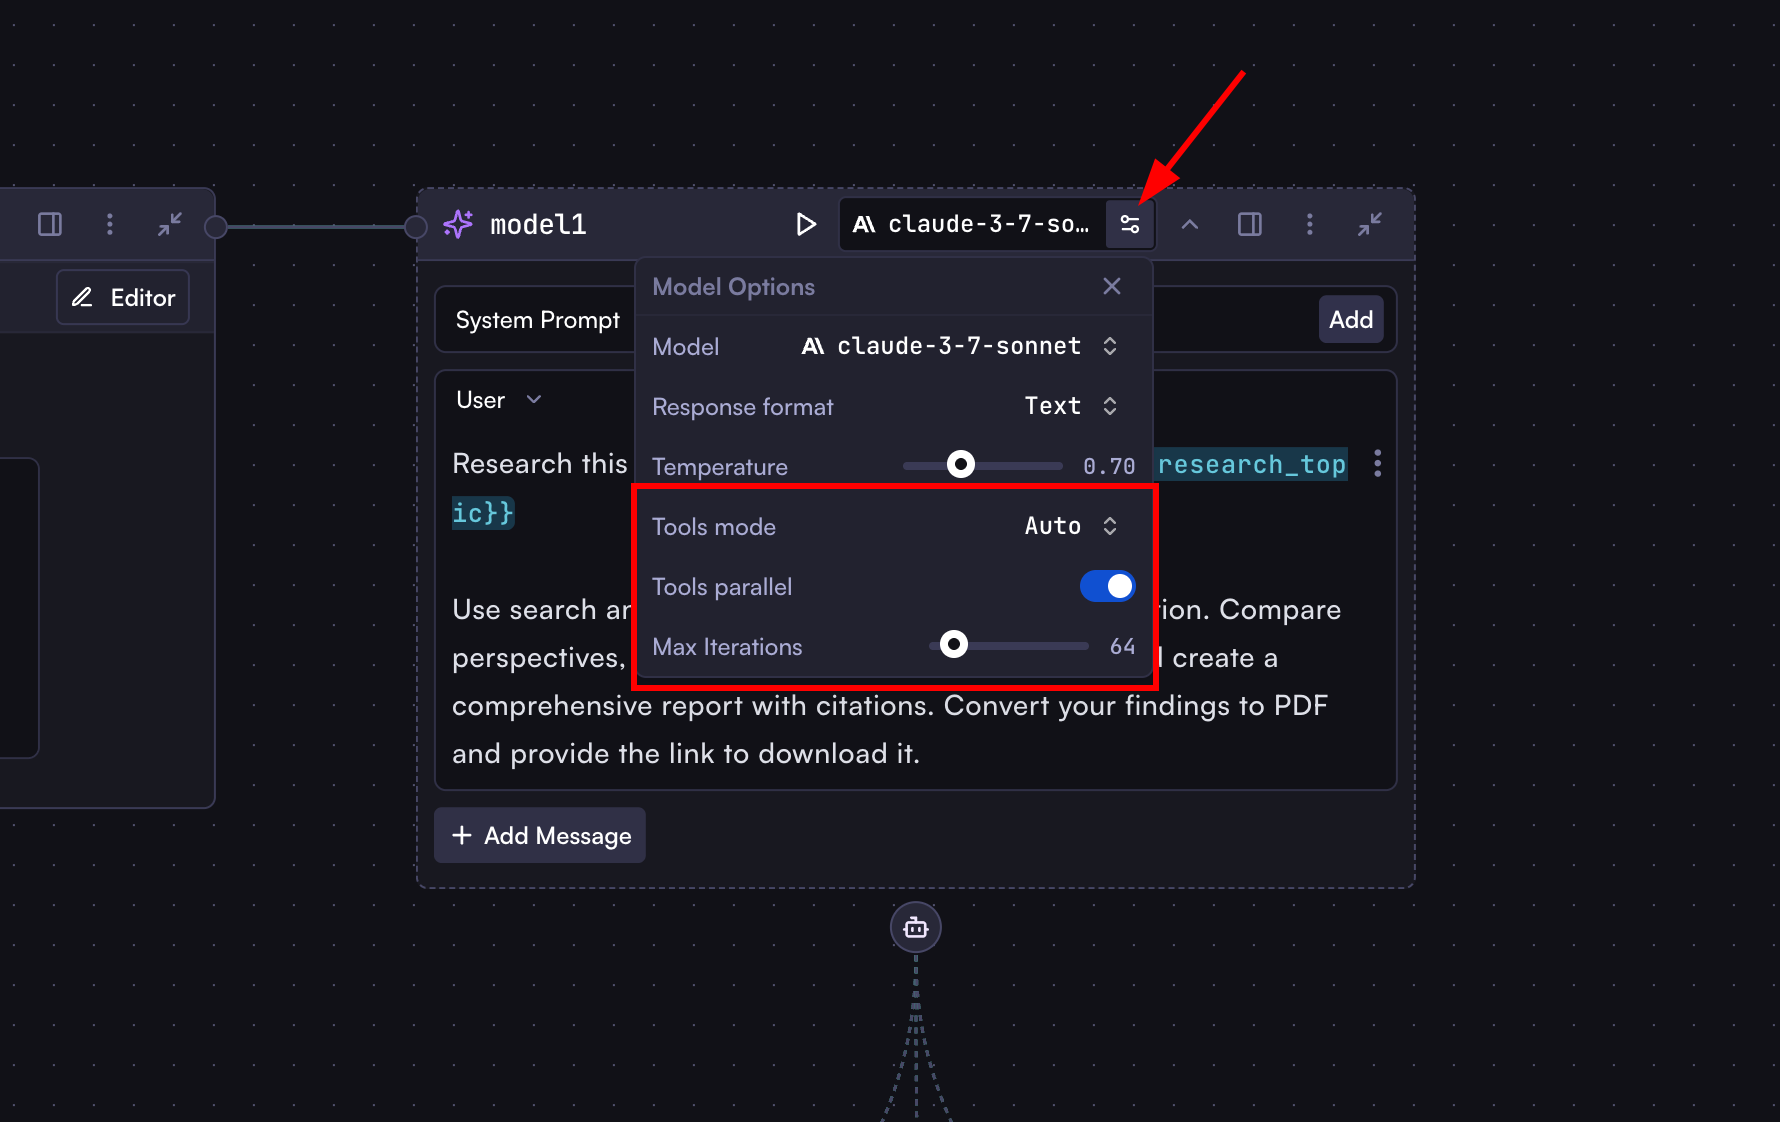
 ## Agent Configuration
In the Model step settings, you'll find special options for agents:
* **Tools Mode**:
* **Auto**: Agent decides when to use tools (recommended)
* **Required**: Agent must always use tools
* **None**: Agent does not use tools
* **Tools Parallel**: Enable parallel execution of multiple tools
* **Max Iterations**: Set the maximum number of tool-calling cycles
## Agent Configuration
In the Model step settings, you'll find special options for agents:
* **Tools Mode**:
* **Auto**: Agent decides when to use tools (recommended)
* **Required**: Agent must always use tools
* **None**: Agent does not use tools
* **Tools Parallel**: Enable parallel execution of multiple tools
* **Max Iterations**: Set the maximum number of tool-calling cycles
 ## Automated Email Response System
Let's see another example. We'll build a complete email processing system. Every time an email arrives, the agent analyzes it, crafts a personalized response, sends it, and notifies your team—all autonomously and within minutes of setup.
* **On Receive Email** trigger
* **Model** agent with tools:
* Send Email Reply
* Inform Team (Slack notification)
## Automated Email Response System
Let's see another example. We'll build a complete email processing system. Every time an email arrives, the agent analyzes it, crafts a personalized response, sends it, and notifies your team—all autonomously and within minutes of setup.
* **On Receive Email** trigger
* **Model** agent with tools:
* Send Email Reply
* Inform Team (Slack notification)
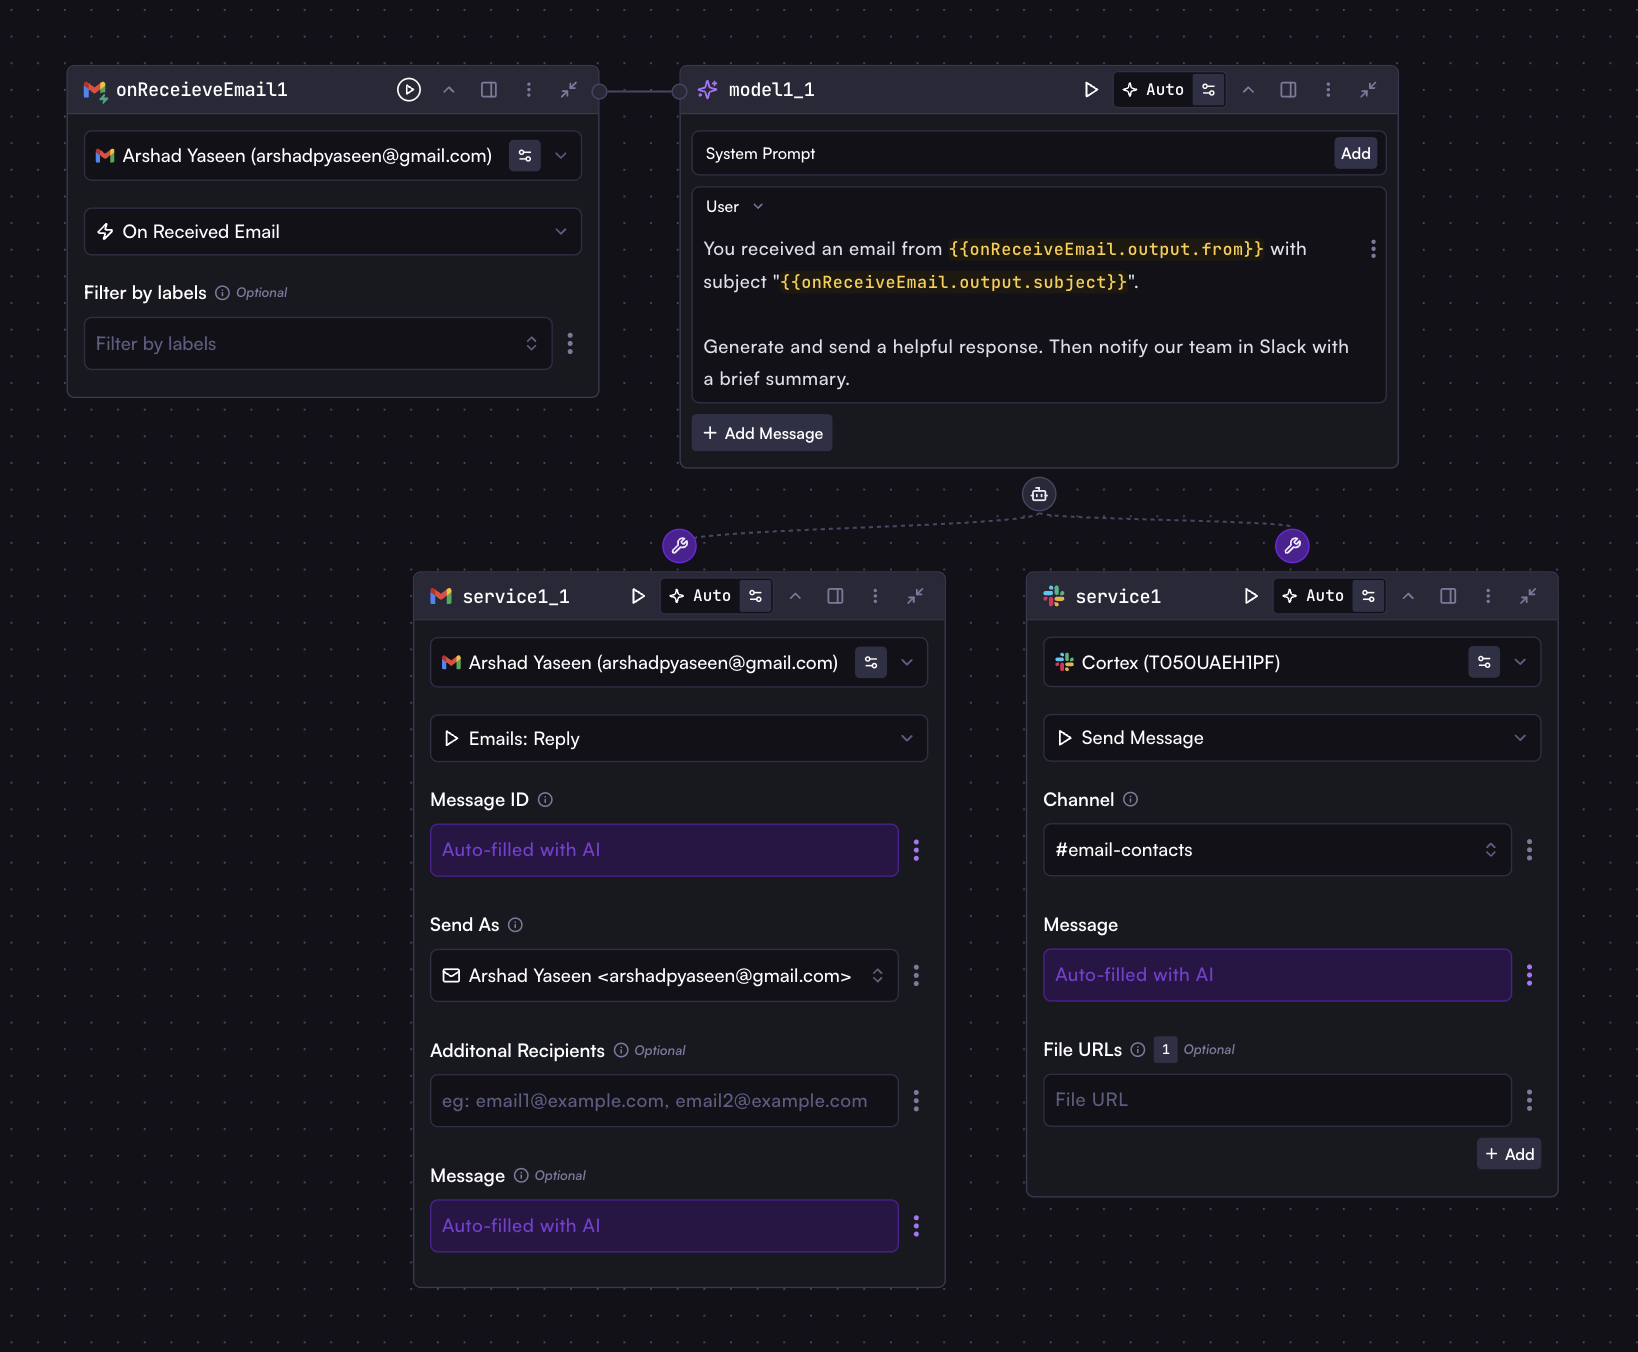 ```
You received an email from {{onReceiveEmail.output.from}} with subject "{{onReceiveEmail.output.subject}}".
Generate and send a helpful response. Then notify our team in Slack with a brief summary.
```
## Multiple Agents in One Workflow
While a single agent can handle complex tasks on its own, you can also use multiple agents in one workflow for specialized tasks:
* Research agent with specialized search tools
* Analysis agent with data processing capabilities
* Communication agent with email and notification tools
This modular approach allows you to create specialized agents for different workflow stages, though in many cases, a well-configured single agent can accomplish what might otherwise require multiple steps.
## Start Building Magical Agents Today
This guide has introduced you to the fundamentals of Cortex agents. Now it's time to build your own intelligent agents for your unique use cases and experience their transformative capabilities firsthand. Our platform continuously expands with new integrations and capabilities, empowering you to create increasingly sophisticated automated workflows that adapt to your business needs.
```
You received an email from {{onReceiveEmail.output.from}} with subject "{{onReceiveEmail.output.subject}}".
Generate and send a helpful response. Then notify our team in Slack with a brief summary.
```
## Multiple Agents in One Workflow
While a single agent can handle complex tasks on its own, you can also use multiple agents in one workflow for specialized tasks:
* Research agent with specialized search tools
* Analysis agent with data processing capabilities
* Communication agent with email and notification tools
This modular approach allows you to create specialized agents for different workflow stages, though in many cases, a well-configured single agent can accomplish what might otherwise require multiple steps.
## Start Building Magical Agents Today
This guide has introduced you to the fundamentals of Cortex agents. Now it's time to build your own intelligent agents for your unique use cases and experience their transformative capabilities firsthand. Our platform continuously expands with new integrations and capabilities, empowering you to create increasingly sophisticated automated workflows that adapt to your business needs.